
How to lay out pattern pieces and make your own cutting layout
A cutting layout is the order in which you place pattern pieces on the fabric, plus a few rules that apply. Here are those rules one by one, worked through with a free T-shirt pattern on three fabric widths. At the end I show how to compute the layout for your own width with PatternNest.
Before you start: fabric, width, right side
Wash the fabric the way you will wash the finished garment, then press it flat. If it shrinks after cutting, no layout is right any more.
Measure the usable width from selvage to selvage, without the firm or pin-holed edges. A bolt that says 150 cm often gives 146 to 148 cm. Plan with that number.
Find the right side. On plain fabrics it is hard to see, so mark it with chalk or a piece of tape before you fold.
Grain: the arrow runs parallel to the selvage
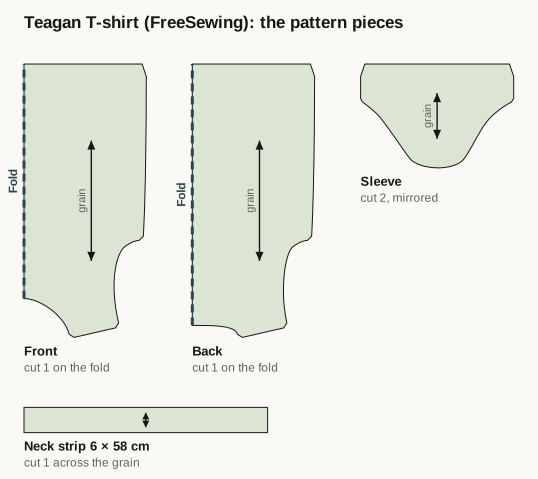
Every pattern piece has a grainline arrow, and it has to run parallel to the selvage. Lay the piece down and measure from both ends of the arrow to the selvage. If both distances match, it is on grain.
A piece cut off grain makes the seam twist later. Side seams creep to the front, trouser legs wrap around the leg. On jersey the arrow follows the knit ribs and the stretch goes across.
Some pieces are meant to sit differently. Cross grain means the arrow points from selvage to selvage, like the neck strip in the example below. Bias means 45 degrees, for bias binding or collar interfacing.
You can turn any piece by 180 degrees and the grain stays the same. Only fabric with a nap or a one-way print rules that out, more on that below.
Cut on fold: half pieces against the fold
Pieces marked cut on fold are drawn as one half. Fold the fabric lengthwise, selvage on selvage, and put the straight centre edge of the piece exactly on the fold. You don't cut along the fold. Opened out, you have one whole, symmetric piece.
The edge really has to sit on the fold. If it slips inwards a little, you cut through the fold and end up with two halves instead of one piece. Pin the fold edge first, then smooth out the rest of the piece.
You don't have to fold across the full width. If you only need a narrow fold, turn in one selvage just as far as the widest fold piece needs. The rest stays single layer for the other pieces. The guide Not enough fabric shows how.
Right sides together and mirrored pieces
Most people fold right sides together, so the right side is inside. You mark on the wrong side and the chalk never shows.
A piece cut through both layers gives you two mirrored pieces, a left and a right sleeve. When the pattern says cut 2, you place it once on folded fabric.
In a single layer that doesn't happen by itself. Cut the piece once, turn the pattern piece over, printed side down, and cut the second one. Cutting the same side twice is the classic mistake.
Nap and one-way prints
Velvet, corduroy, nicky velour, faux fur and directional prints look different depending on direction. Then every piece has to point its top towards the same end of the fabric. Turning by 180 degrees is out, and that costs fabric.
For the example shirt below, folded on 110 cm it takes 1.67 m instead of 1.54 m, single layer on 150 cm 0.82 m instead of 0.75 m. Folded on 140 and 150 cm it changes nothing. How much the nap costs for other patterns is in One-way fabric: how much extra.
Order: fold pieces first, then the big ones, then the gaps
If you cut the first piece before everything is placed, the space often runs out for exactly the last piece.
- Place every piece that goes on the fold first. Their position is fixed.
- Then the largest remaining pieces, each checked for grain.
- Small pieces such as facings, pockets and strips fill the gaps.
- Pin or weigh everything down only when all pieces are placed. Then count: do quantities and pairs match the pattern's cutting list?
- Cut only after that, from one end of the fabric to the other, and transfer notches and markings straight away.
Reading the layout diagram in your pattern
How far off that estimate can be is in Fabric width conversion.
Many commercial patterns include cutting layouts: small diagrams for each fabric width, often split by view, size group and fabric with or without nap. The legend shows which edge is the fold and which pieces lie printed side down. The numbers refer to the piece list.
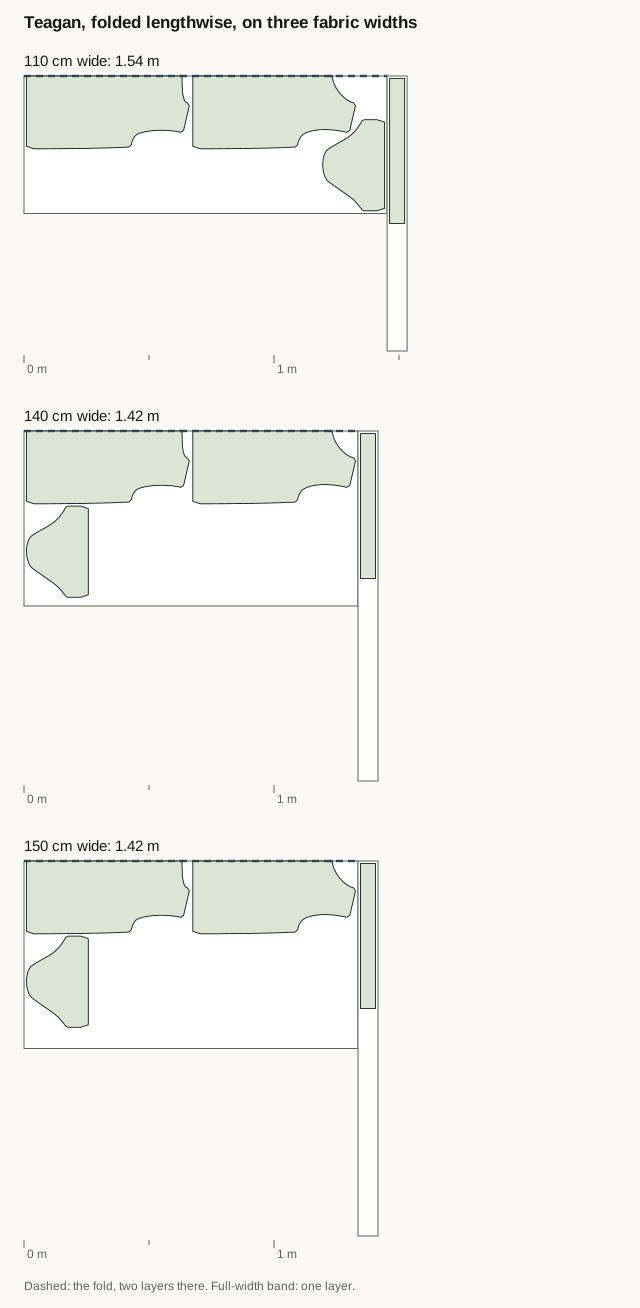
A layout diagram is valid for the width it was drawn for. On another width, pieces that sat side by side no longer fit next to each other, or a wide strip is left over. For the example shirt folded on 150 and 140 cm, the sleeve sits next to the body, 1.42 m both times. On 110 cm there is no room for it, so it moves to the end: 1.54 m.
A single layer behaves differently again: 0.75 m on 150 cm, 0.86 m on 140 cm, 1.16 m on 110 cm. If your width is missing from the pattern, converting by area is only an estimate.
The example: the Teagan T-shirt
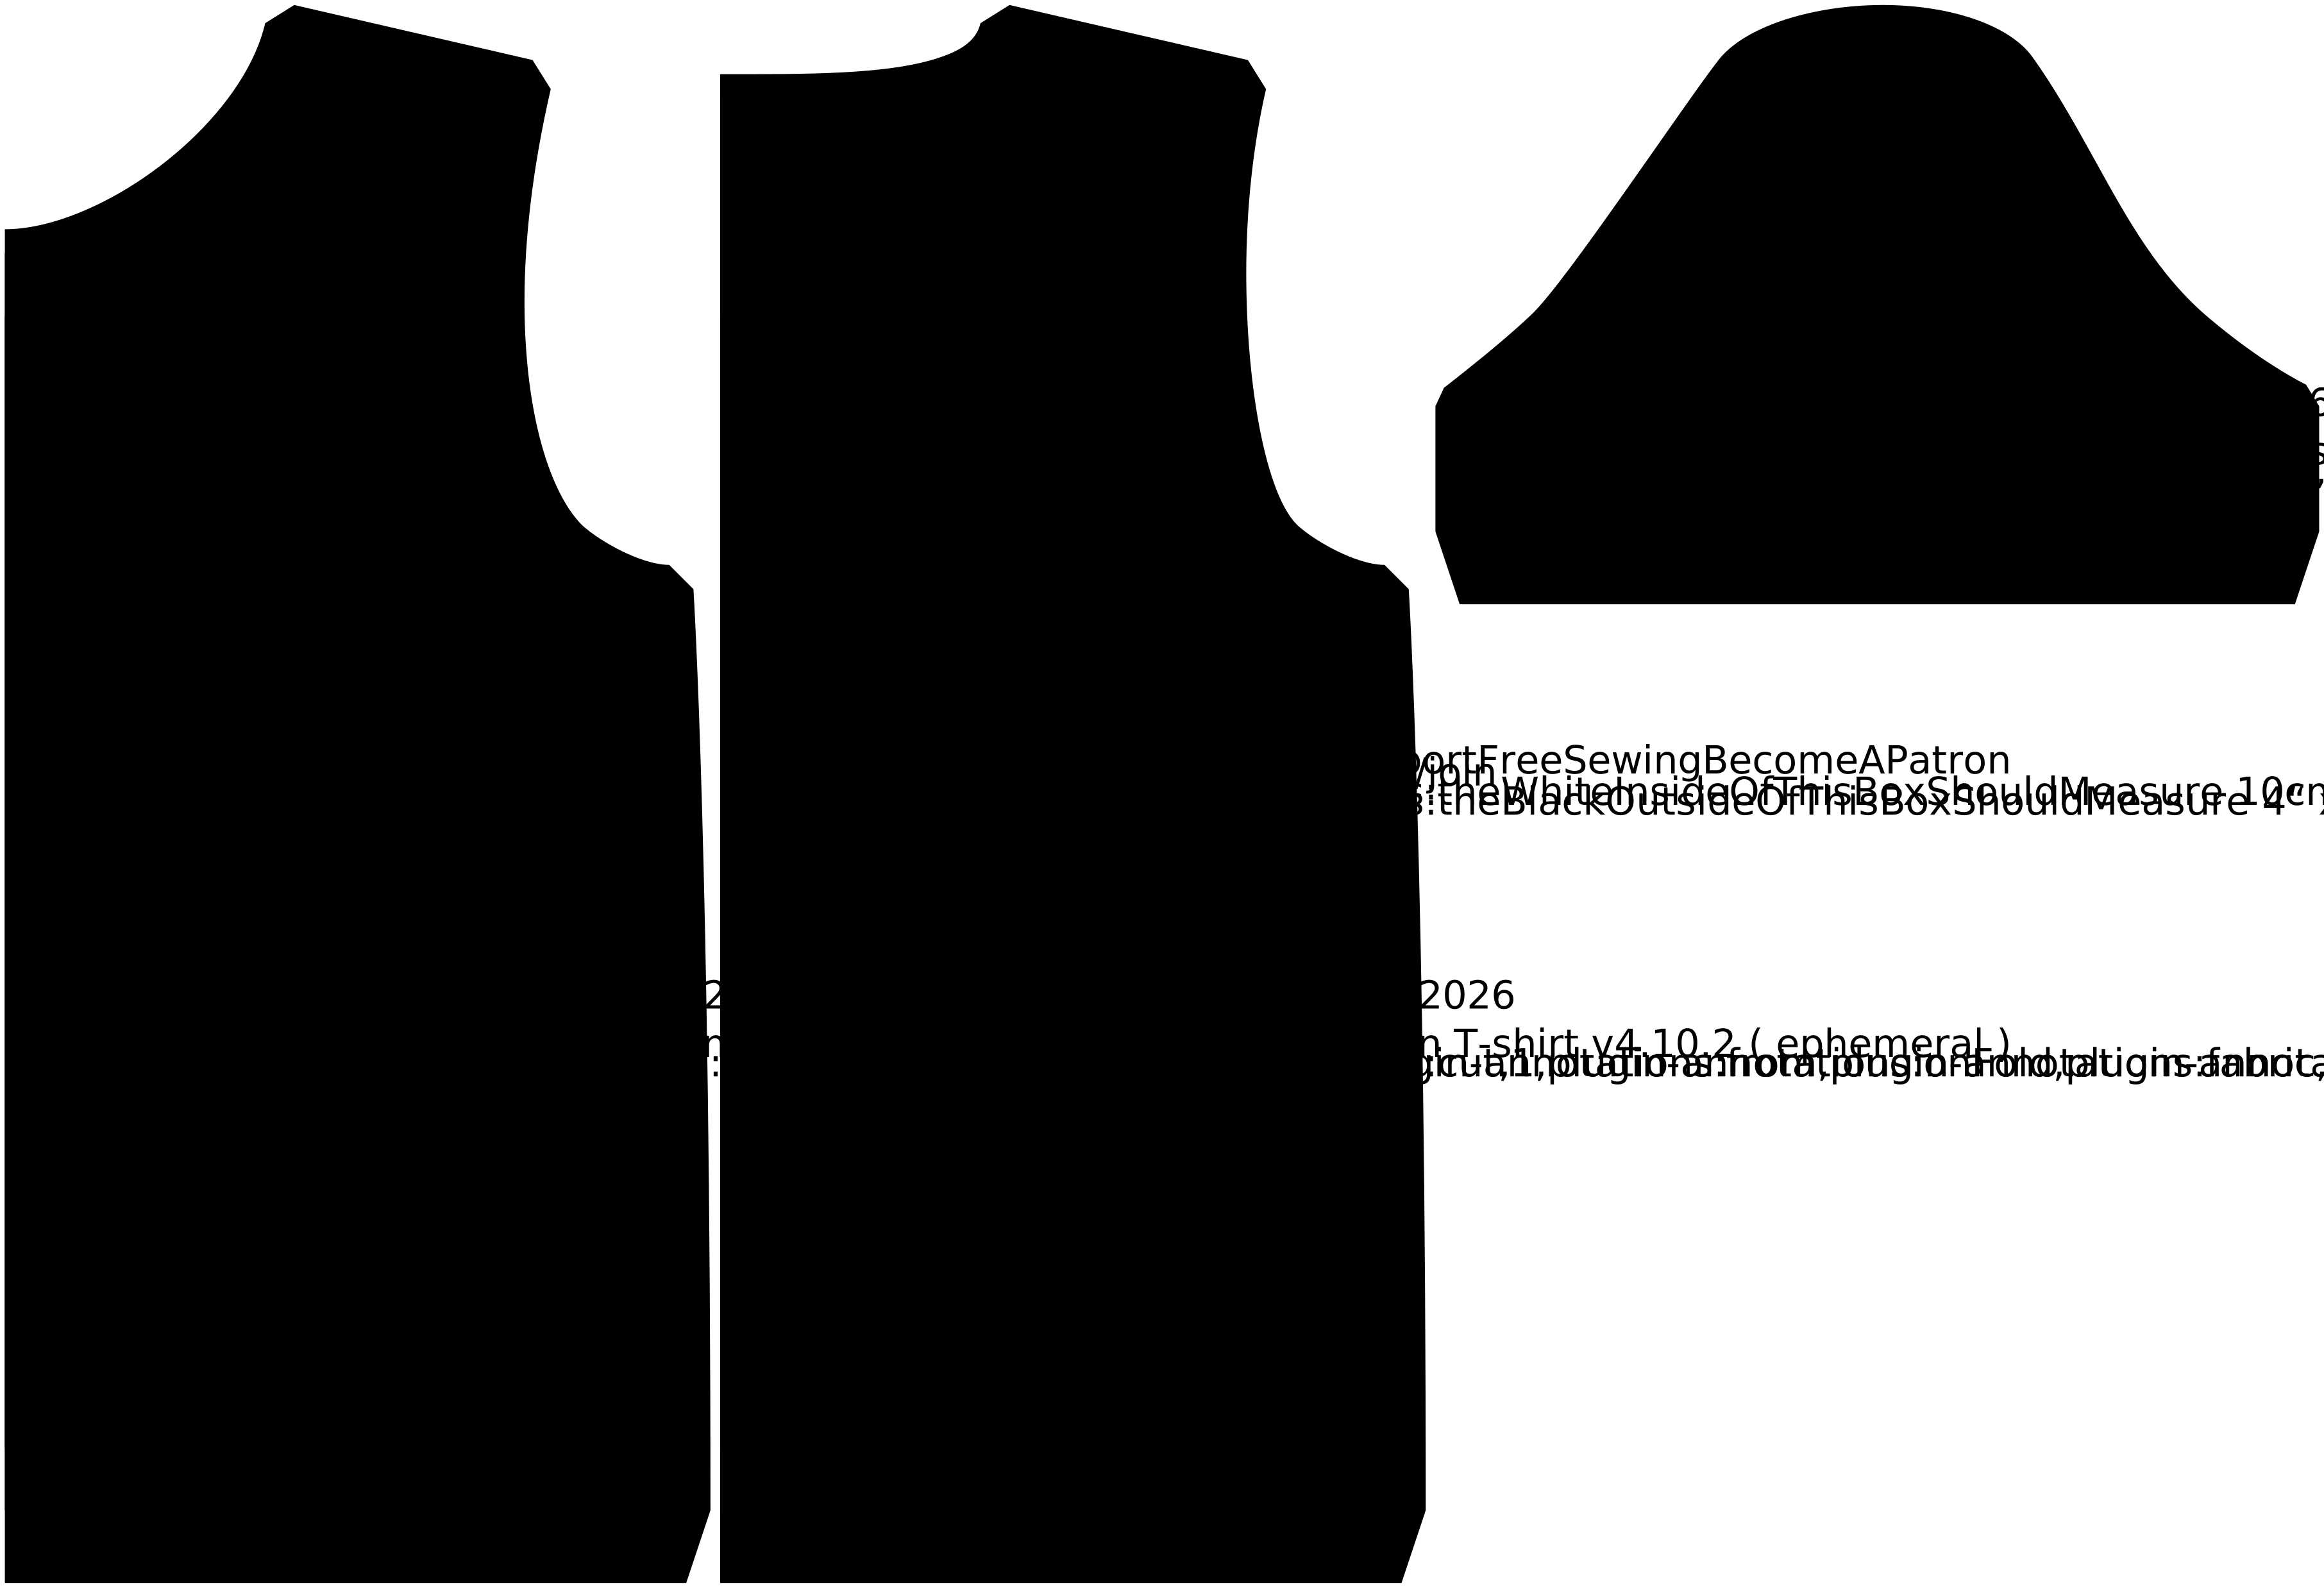
Teagan is an open T-shirt pattern from FreeSewing, designed and coded by Joost De Cock, under the MIT licence. I exported it as SVG with FreeSewing 4.10.2, FreeSewing's sample measurements cisFemaleAdult36 and 10 mm seam allowance. Front and back are cut on the fold, the sleeve twice as a mirrored pair. FreeSewing gives the neck strip only as measurements, 6 × 58 cm across the grain, so I drew it as a separate file.
I develop PatternNest, which computed the layouts below. This article is not affiliated with FreeSewing.
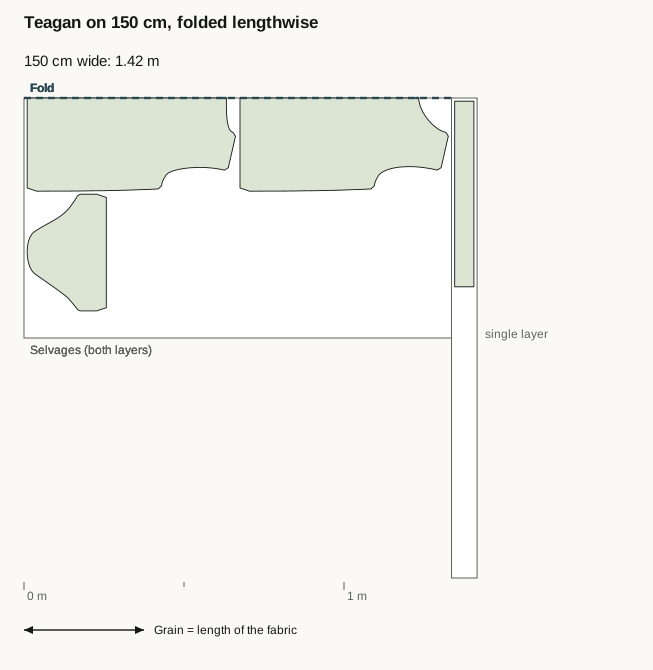
The layout on 150 cm
| Fabric width | Folded lengthwise | Single layer | Folded, with nap | Single layer, with nap |
|---|---|---|---|---|
| 110 cm | 1.54 m | 1.16 m | 1.67 m | 1.37 m |
| 140 cm | 1.42 m | 0.86 m | 1.42 m | 0.94 m |
| 150 cm | 1.42 m | 0.75 m | 1.42 m | 0.82 m |
Computed with a 1 cm margin at the selvages and 1 cm between pieces.
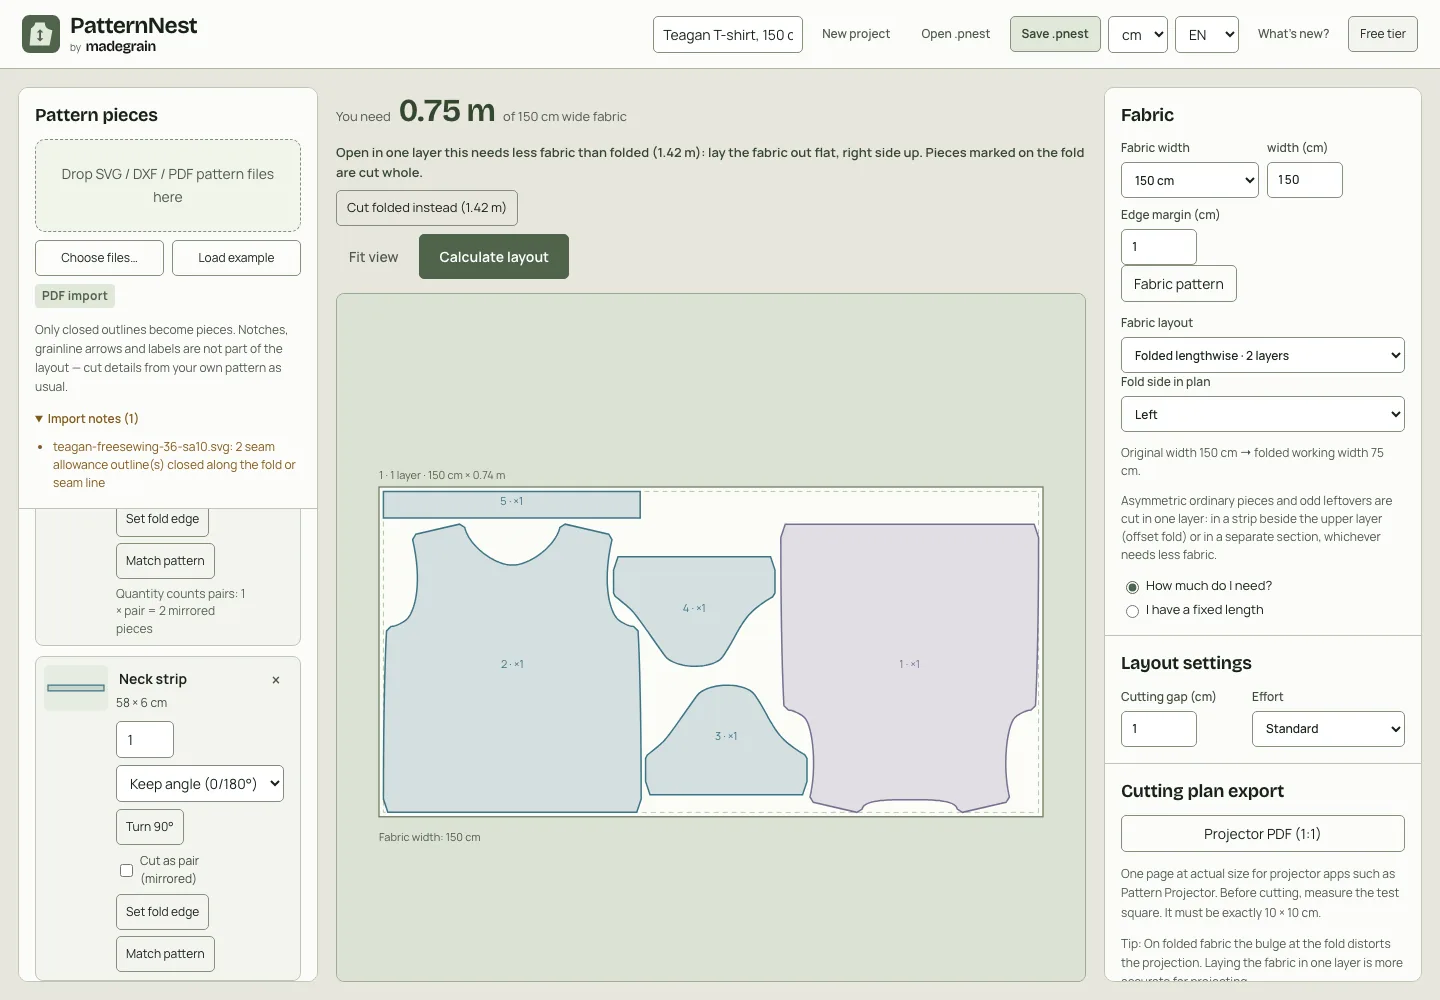
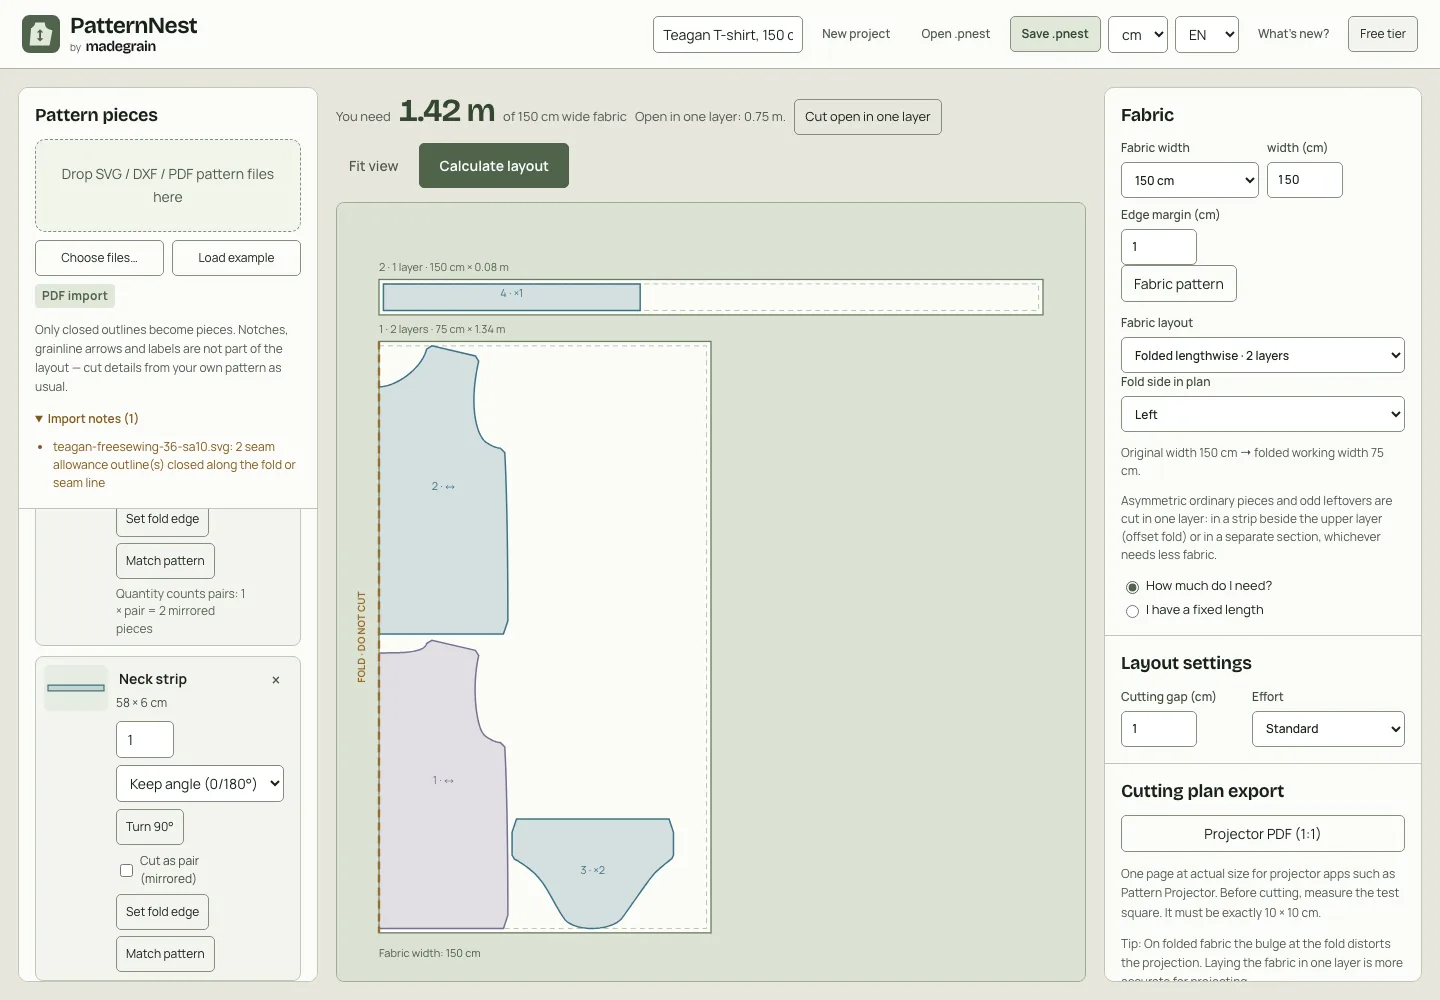
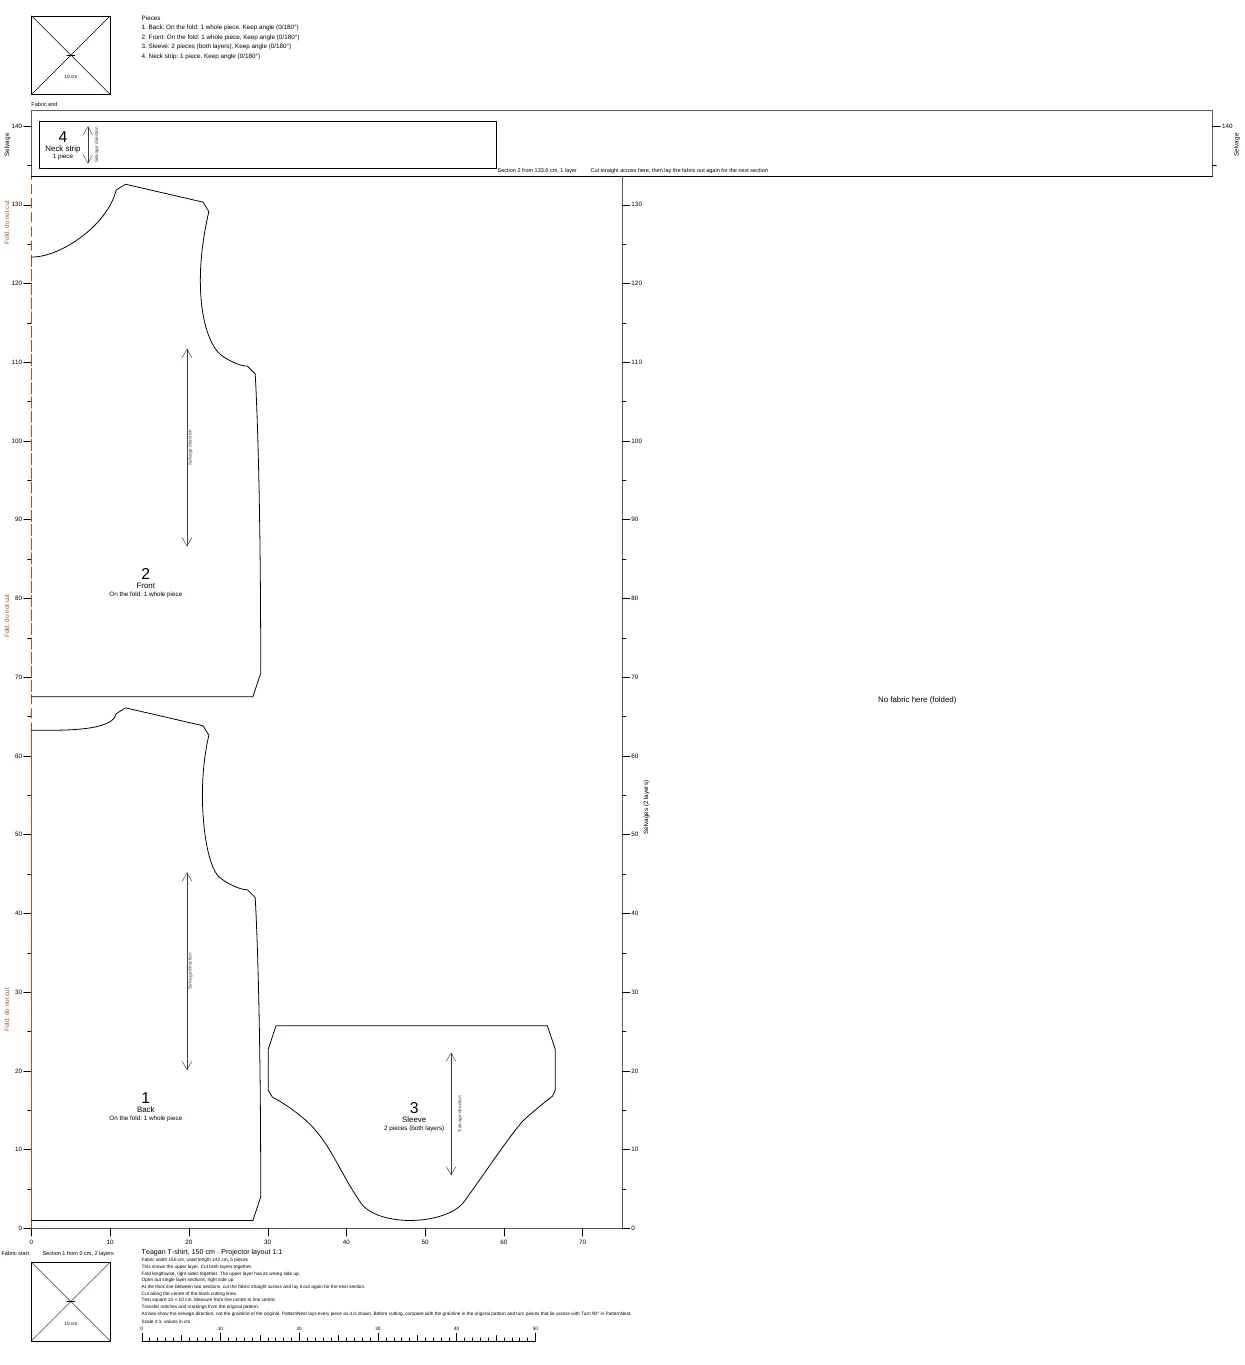
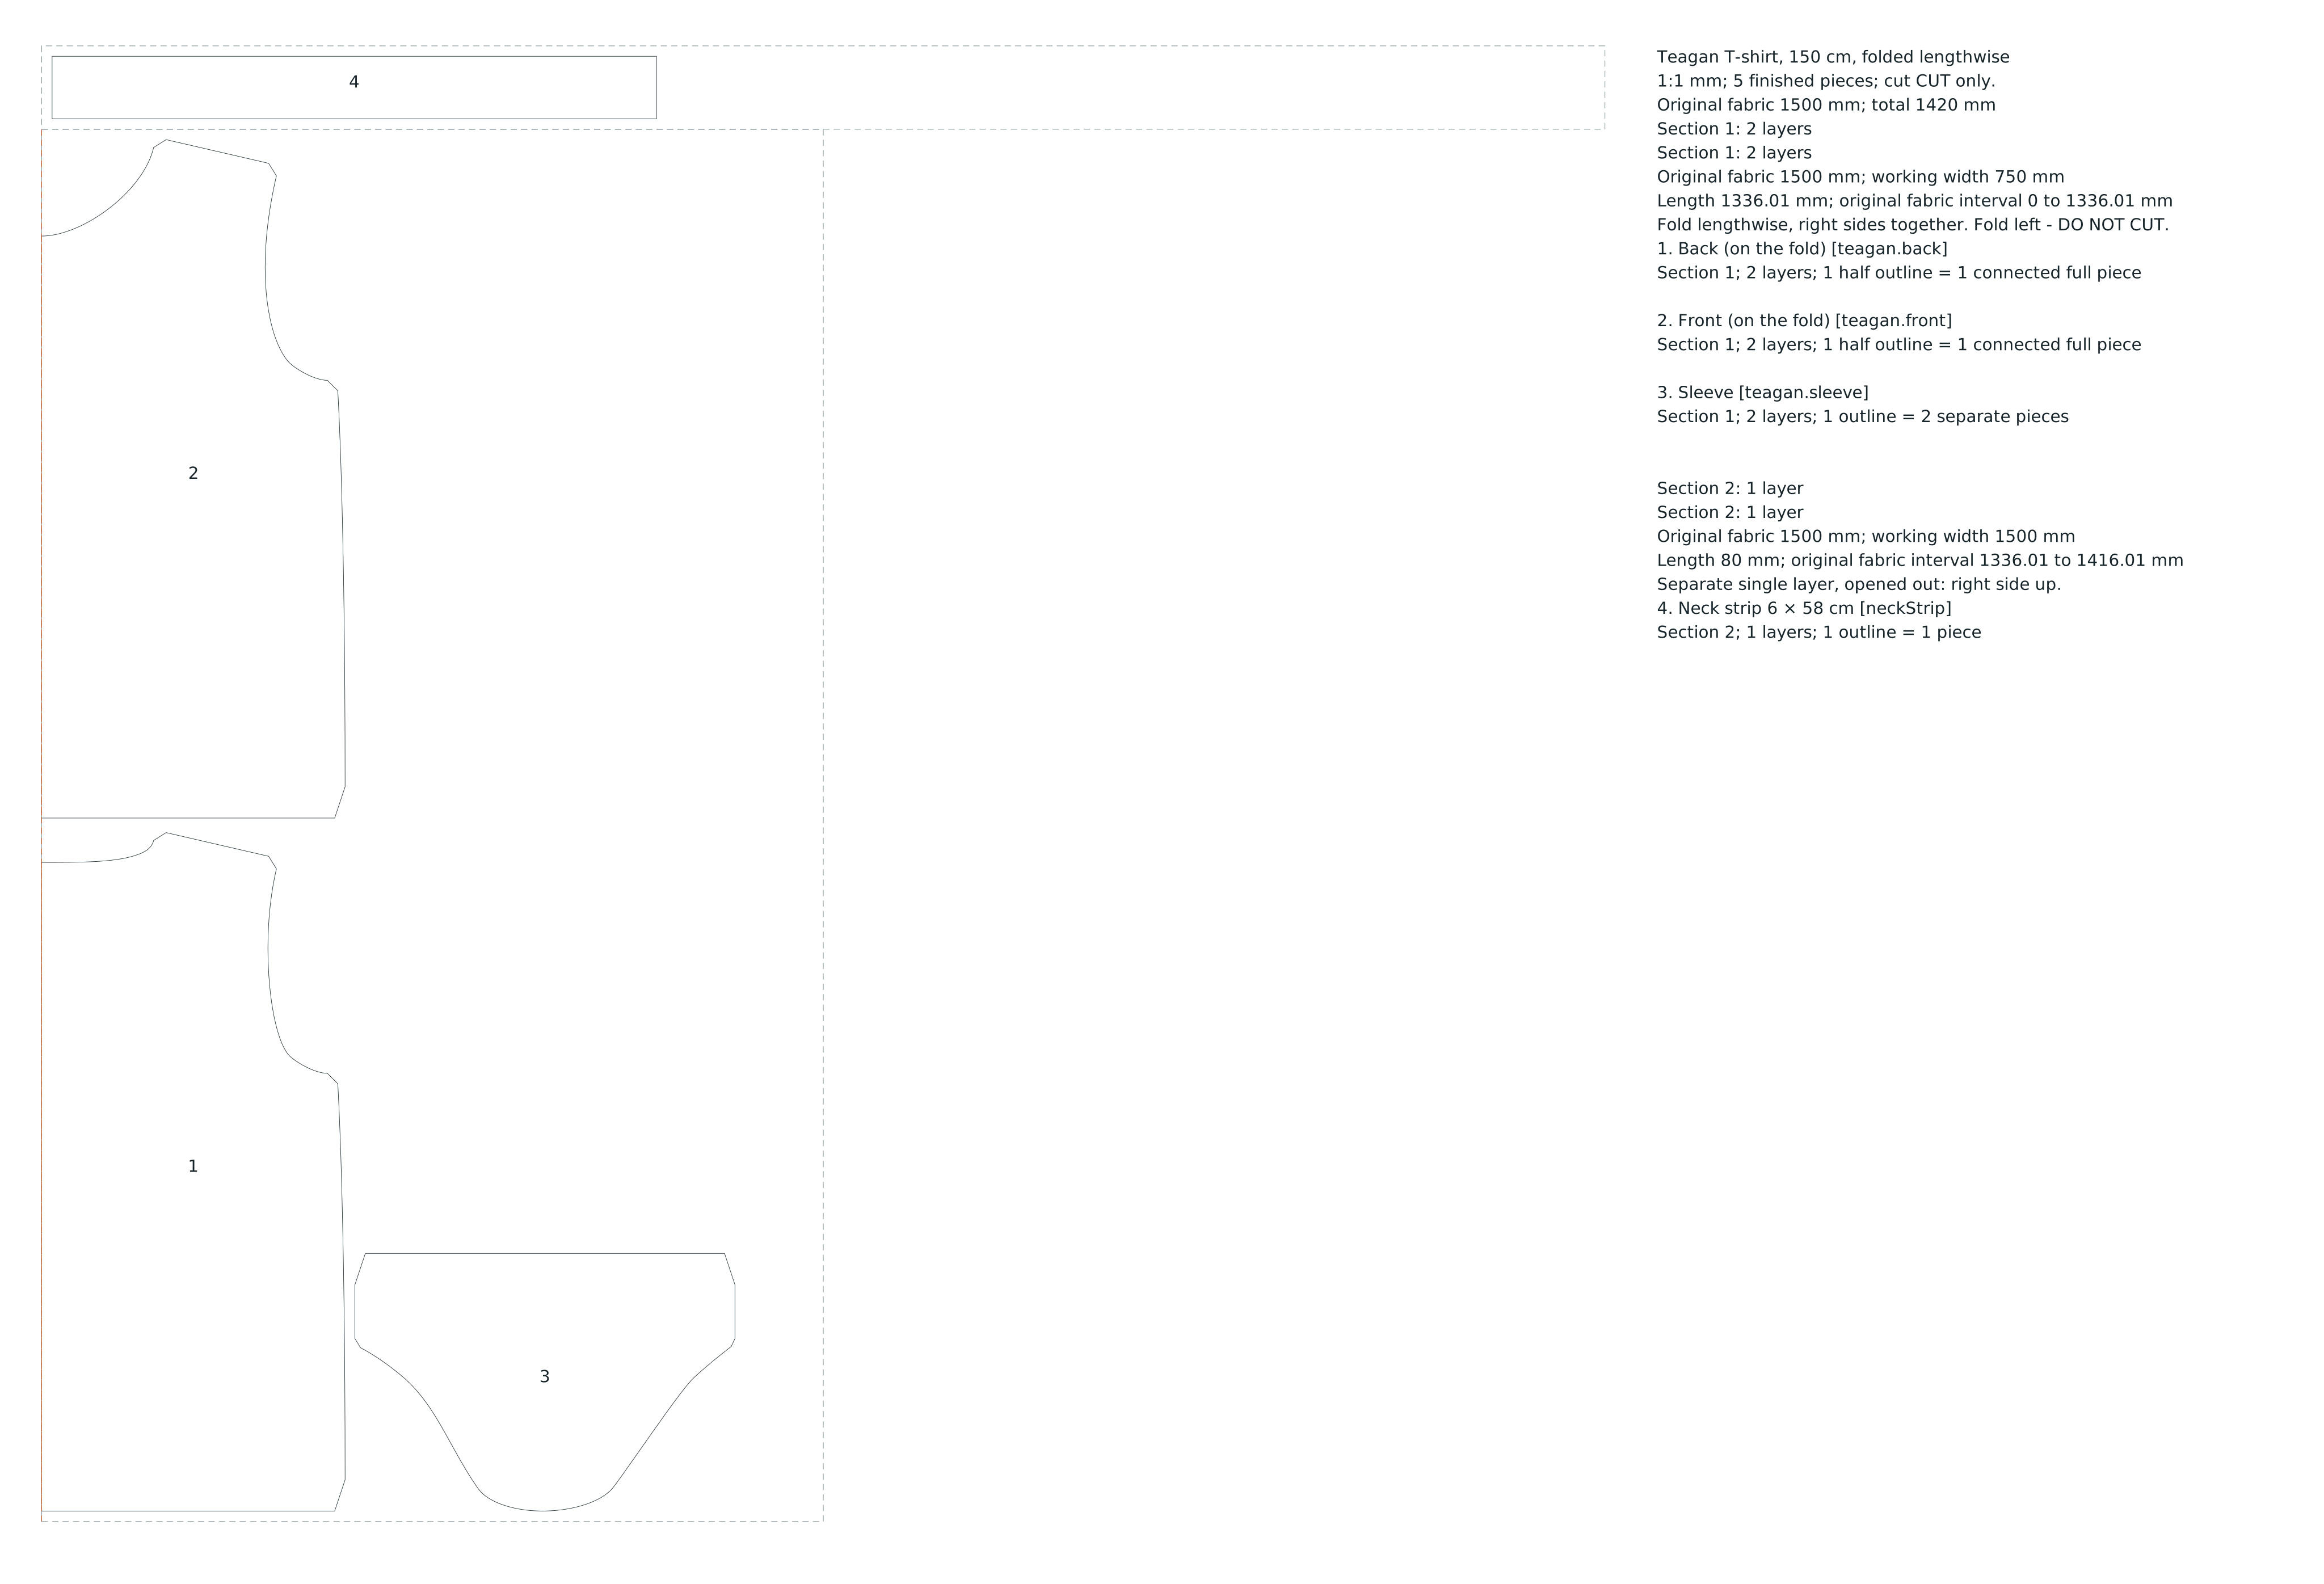
Front and back sit one behind the other with their centre edge on the fold, each 65 cm long. The sleeve is 37 cm wide and fits next to the front, because half a body piece is only 29 cm wide. It is placed once through both layers, which gives the pair. The neck strip goes single layer at the end, across the full width.
That comes to 1.42 m. In a single layer, with front and back opened out, the big pieces sit side by side and it is only 0.75 m. In exchange you cut every piece on its own and need front and back as whole pattern pieces.
With PatternNest: the layout for your width
All of this works with paper and a tape measure. If you want to know before buying how much you need on your width, PatternNest computes the layout from the pattern pieces. This is how I did the example in the live app:
- Export the pattern from FreeSewing as SVG with seam allowance. In PatternNest, click Choose files… under Pattern pieces and pick the SVG file and the neck strip file.
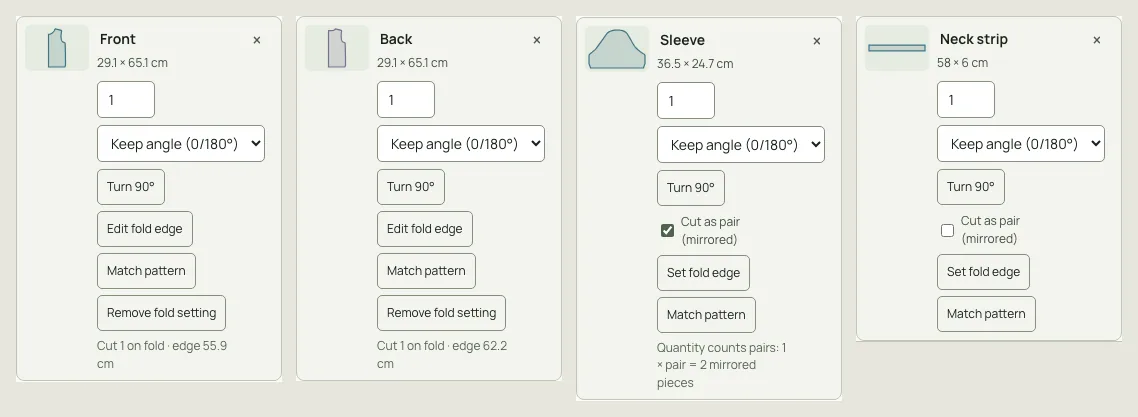
- PatternNest takes the allowance line as the cutting outline and lists the pieces with their sizes. Name them if you like.
- For front and back, click Set fold edge, pick the straight centre edge, then Use selected fold edge. For the sleeve, tick Cut as pair (mirrored).
- Under Fabric, choose the width, 150 cm here, and keep Folded lengthwise · 2 layers. Click Calculate layout.
- PatternNest also computes the open single layer. If that is shorter, it shows it first: You need 0.75 m, with the button Cut folded instead (1.42 m) below. One click brings back the folded layout.
- Under Cutting plan export you download the layout as PDF, SVG or DXF, or as a 1:1 projector PDF. Before cutting, measure the test square in the projected image: it has to be 10 × 10 cm.
What PatternNest doesn't do
PatternNest doesn't print pattern sheets. It doesn't tile the pattern onto A4 or letter pages and makes no file for A0 printing. For paper you need the pattern's own file.
It doesn't draft or fit patterns and doesn't add seam allowance. Notches, grainline arrows and labels don't go into the export. Keep your original pattern for cutting and marking.
You set grain, fold edges and pairs yourself. The computed length is not a proven minimum and holds no reserve for shrinkage.
Download and try it
With the FreeSewing SVG and the neck strip you can try the import yourself. Open the .pnest project in PatternNest with Open .pnest, then click Calculate layout. The layout SVG is the folded layout at 1:1 scale.

How the numbers were checked
Every layout passed PatternNest's check on the real outlines: no overlap, at least 1 cm spacing, everything on the fabric. Wider fabric is never longer than narrower, with nap never shorter than without. Computed with the version of PatternNest that was online on 2 November 2026 and checked again in the live app.
Further reading
How much fabric a whole garment takes and how yardage charts are meant is in How much fabric do I need? If the fabric runs short, even with a partial fold, see Not enough fabric. The extra for velvet and corduroy is in One-way fabric. How to put the layout straight onto the fabric with a projector is in Projector sewing.
Sources
FreeSewing Teagan, cisFemaleAdult36, 10 mm seam allowance, FreeSewing 4.10.2. Design and code by Joost De Cock, MIT licence. Neck strip from FreeSewing's measurements. Layout computation, screenshots and article: Cayan / Madegrain.